


Build and animate thermometer using Core Animation
What are we going to build?
Let’s get started!
We will first start by creating a file ThermometerView which will be a subclass of UIView . All our code related to building and animating a thermometer will go in this file. This will be a reusable view which can be used in any iOS application.
Let’s create the bottom round shape of the thermometer.
let bodyLayer = CAShapeLayer()

    override init(frame: CGRect) {
        super.init(frame: frame)
        setup()
    }

    required init?(coder: NSCoder) {
        fatalError("init(coder:) has not been implemented")
    }

    private func setup() {
        setupBodyLayer()
    }

    private func setupBodyLayer() {

        let lineWidth = bounds.width/3
        let width = bounds.width - lineWidth
        let height = bounds.height - lineWidth/2

        layer.addSublayer(bodyLayer)

        let bodyPath = UIBezierPath(ovalIn: CGRect(x: lineWidth/2, y: height - width, width: width, height: width))
        bodyLayer.path = bodyPath.cgPath
        bodyLayer.strokeColor = UIColor.white.cgColor
        bodyLayer.lineWidth = width/3
    }
Output will look like this:

We have create a layer bodyLayer of type CAShapeLayer which will be responsible for building the outer layer of the thermometer. setup() method is responsible for setting all the things related to layers. Inside the setupBodyLayer() method we have created 3 different properties lineWidth , width and height .
We are adding the bodyLayer to our views sublayer using addSublayer method.
UIBezierPath has an initialiser which takes a CGRect and draws the biggest possible oval in that rectangle. We have used it to draw our round shape of thermometer. We have used path , strokeColor and lineWidth property of the layer to style it better.
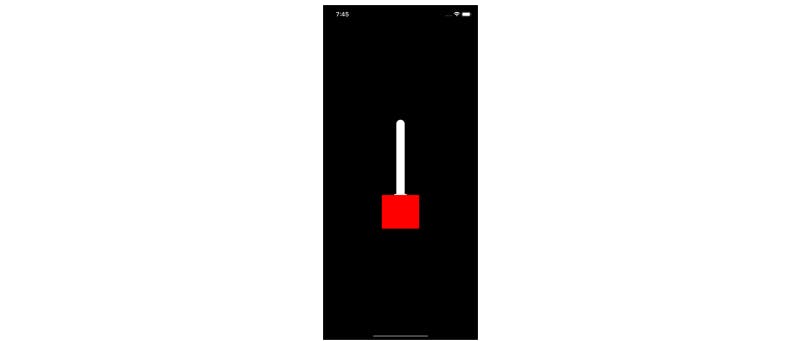
Our next step is to create the upper body of the thermometer. We can do this by moving the path to the top of the circle and then drawing a vertical line with some width. Let’s modify the path that we have created to make the changes.
private func setupBodyLayer() {

        let lineWidth = bounds.width/3
        let width = bounds.width - lineWidth
        let height = bounds.height - lineWidth/2

        layer.addSublayer(bodyLayer)

        let bodyPath = UIBezierPath(ovalIn: CGRect(x: lineWidth/2, y: height - width, width: width, height: width))
        bodyPath.move(to: CGPoint(x: width/2 + lineWidth/2, y: height - width))
        bodyPath.addLine(to: CGPoint(x: width/2 + lineWidth/2, y: 20))
        bodyLayer.path = bodyPath.cgPath
        bodyLayer.strokeColor = UIColor.white.cgColor
        bodyLayer.lineWidth = width/3
        bodyLayer.lineCap = .round
    }
Output will look like this:

Here we have added 3 lines, first we have moved our path cursor to top mid of circle using moveTo method and then we have created a line using addLine method. In the end we have used lineCap = .rounded which simply gives rounded shape to the top of the line that we have drawn.
Next we will create a levelLayer which we can move using a pan gesture and it will act as a layer which shows temperature in a thermometer.
let levelLayer = CAShapeLayer()

    var level: CGFloat = 0.3 {
        didSet {
            levelLayer.strokeEnd = level
        }
    }

    private func setupLevelLayer() {

        layer.addSublayer(levelLayer)

        let levelPath = UIBezierPath()
        levelPath.move(to: CGPoint(x: bounds.midX, y: bounds.height))
        levelPath.addLine(to: CGPoint(x: bounds.midX, y: 0))
        levelLayer.path = levelPath.cgPath
        levelLayer.strokeColor = UIColor.red.cgColor
        levelLayer.lineWidth = bounds.width
        levelLayer.strokeEnd = level
    }
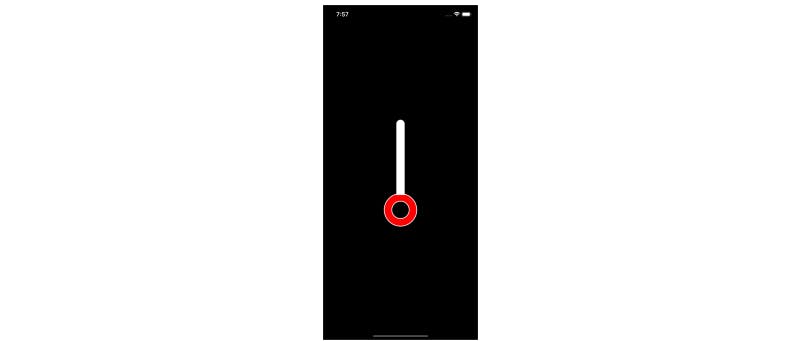
We have created a new layer levelLayer and simply drawn a big fat line from the bottom of the view to the top of the view. We have used lineWidth property to make the line fatter and equal to the width of the parent view.
Output will look like this:
You will notice that the levelLayer not expanding up to the full height of the parent view, this is because we have used a property called strokeEnd
strokeEnd is a CGFloat and accepts value between 0 and 1. We have used 0.3 as the value so it is filling up 30% of the parent view. Next we will use pan gesture and change the strokeEnd value on the basis of our movement on the screen.
private func setupLevelLayer() {

        layer.addSublayer(levelLayer)

        let levelPath = UIBezierPath()
        levelPath.move(to: CGPoint(x: bounds.midX, y: bounds.height))
        levelPath.addLine(to: CGPoint(x: bounds.midX, y: 0))
        levelLayer.path = levelPath.cgPath
        levelLayer.strokeColor = UIColor.red.cgColor
        levelLayer.lineWidth = bounds.width
        levelLayer.strokeEnd = level

        let pan = UIPanGestureRecognizer(target: self, action: #selector(didPan))
        addGestureRecognizer(pan)
    }

    @objc private func didPan(recognizer: UIPanGestureRecognizer) {

        let translation = recognizer.translation(in: self)
        let percent = translation.y/bounds.height
        level = max(0, min(1, levelLayer.strokeEnd - percent))
        levelLayer.strokeEnd = level
        recognizer.setTranslation(.zero, in: self)
    }
We have added a UIPanGestureRecognizer inside setupLevelLayer method.
didPan method will be called whenever we move our thumb in the view. We are simply checking the translation inside the view using translation method. After that we are calculating the percent movement with respect to the height of the parent view. If you build and run at this time you will see that the red level layer will move up and down as you move your thumb over the screen.
Masking!
Next we will create a mask layer which will be similar to the body layer. This mask will be used with the level layer to create the drawing that we need.
let maskLayer = CAShapeLayer()

    private func setupMaskLayer() {

        maskLayer.path = bodyLayer.path
        maskLayer.strokeColor = bodyLayer.strokeColor
        maskLayer.lineWidth = bodyLayer.lineWidth - 4
        maskLayer.lineCap = bodyLayer.lineCap
        maskLayer.fillColor = nil

        levelLayer.mask = maskLayer
    }
Output will look like this:
We have created a new layer maskLayer which takes all the property of the bodyLayer with one additional property fillColor = nil
We then add it as a mask to the levelLayer which will give us the desired result. Notice we have used lineWidth = bodyLayer.lineWidth — 4 , this is done so that we can see nice little white colour on the outer side of the thermometer. If we make the lineWidth equal we would not be able to see the white border of our bodyLayer
Wrapping Up
This was a simple thermometer and animation that we created using CAShapeLayer . If you have anything to discuss or some suggestions feel free to drop a comment.
You can find the full source code on Github.